Hi! Chances are high that, when you are reading this, you never created a plugin for the Bukkit/Spigot-API yet, or that you did so without having used Maven. So, let’s go right ahead
What is the Spigot-API?
The Spigot API is the interface between your plugin and the Minecraft server. It provides many useful features for you to interact with the game.
What is Maven?
Maven is the most widely used build and dependency management tool for Java. We will use it to include the required dependencies (Spigot-API) and handle building your .jar file.
Requirements
You will need the following things to be able to create your first plugin:
- At least basic knowledge in Java
- Having Java and Minecraft installed
- A decent IDE that can interact with Maven. I highly recommend IntelliJ IDEA Community Edition.
I will be using IntelliJ IDEA as IDE in this tutorial, because it’s free, easier to use than for example Eclipse, and it offers the best Maven support. I highly suggest that you do the same!
Let’s get started!
Creating your first project
First of all, we create a new empty Maven project. When you opened IntelliJ for the first time now, you can click on New Project in the Welcome Screen. Otherwise click on File -> New -> Project …
Now select Maven and click Next. Give your plugin a descriptive name, such as HelloWorldPlugin. If you use another name, please also replace HelloWorldPlugin with the name you chose in all further steps.
IntelliJ will now automatically open your pom.xml file. It is used to tell Maven what dependencies your plugin needs and how it should be compiled. Just copy/paste this example pom.xml:
<?xml version="1.0"?>
<project xmlns="http://maven.apache.org/POM/4.0.0" xmlns:xsi="http://www.w3.org/2001/XMLSchema-instance" xsi:schemaLocation="http://maven.apache.org/POM/4.0.0 http://maven.apache.org/xsd/maven-4.0.0.xsd">
	<modelVersion>4.0.0</modelVersion>

	<!-- The GroupID is something like your personal "identifier" for maven. If you own a domain, you can just -->
	<!-- use it in the backwards way, e.g. if you own "example.com", use "com.example". -->
	<!-- You can also just use "me.yourusername" (obviously you have to replace "yourusername" with your username) -->
	<groupId>me.yourusername</groupId>

	<!-- The name of your plugin. Should only contain normal letters, numbers, and hyphens (-). -->
	<artifactId>HelloWorldPlugin</artifactId>

	<!-- The version. You should change this on every new release. -->
	<version>1.0-SNAPSHOT</version>

	<properties>
		<project.build.sourceEncoding>UTF-8</project.build.sourceEncoding>

		<!-- The Java version used to compile the plugin. I suggest to use 1.8 because many servers are still using Java 8. -->
		<maven.compiler.source>1.8</maven.compiler.source>
		<maven.compiler.target>1.8</maven.compiler.target>
	</properties>

	<!-- In the following section you can define dependencies for your plugin. -->
	<!-- Right now, we only need the Spigot API -->
	<dependencies>
		<dependency>
			<groupId>org.spigotmc</groupId>
			<artifactId>spigot-api</artifactId>
			<version>1.17.1-R0.1-SNAPSHOT</version>
			<scope>provided</scope>
		</dependency>
	</dependencies>

	<!-- Here we tell maven where it should look for the defined dependencies. -->
	<!-- Right now, we only need the Spigot repository because we don't have other dependencies -->
	<repositories>
		<repository>
			<id>spigot-snapshots</id>
			<url>https://hub.spigotmc.org/nexus/content/repositories/snapshots/</url>
		</repository>
	</repositories>

	<build>
		<resources>
			<!-- This tells Maven that it should "filter" all files in the resource directory. More on that later. -->
			<resource>
				<directory>src/main/resources</directory>
				<filtering>true</filtering>
			</resource>
		</resources>
	</build>
</project>
Please replace the <groupId> part in the highlighted line. I added some comments so you know what you can use as Group ID. For example, if you own the domain example.com, you can use com.example for your Group ID. If you do not own any domain, just use me.<yourusername>. Please note that the GroupID may not contain any special symbols, so if your username consists of Chinese symbols or something, just invent a new username for this purpose 😀
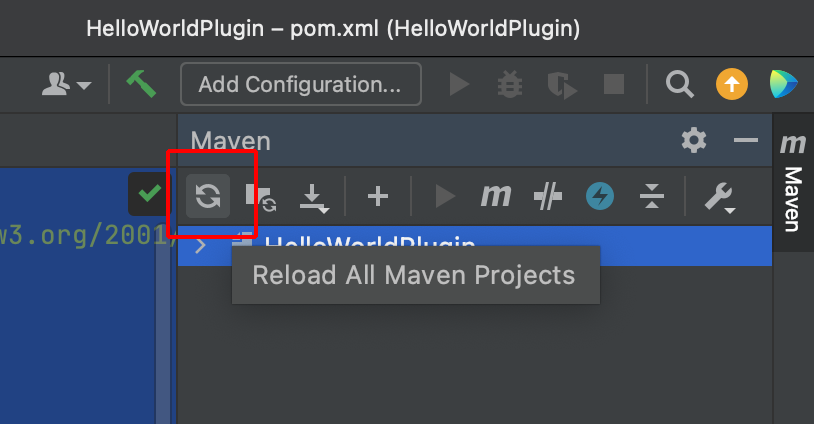
After you have copy/pasted the pom.xml, you will need to tell IntelliJ to read this file again, so that it downloads and detects the Spigot-API. Just click on Maven in the top right corner, and then hit the Reload All Maven Projects button. If this is your first time, it will take some time because it has to download the Spigot-API first. You can see the progress in the status bar at the bottom.
Creating your plugin.yml file
Now we’re going to add our plugin.yml file. This file is needed by Bukkit/Spigot to actually load your plugin when the server starts.
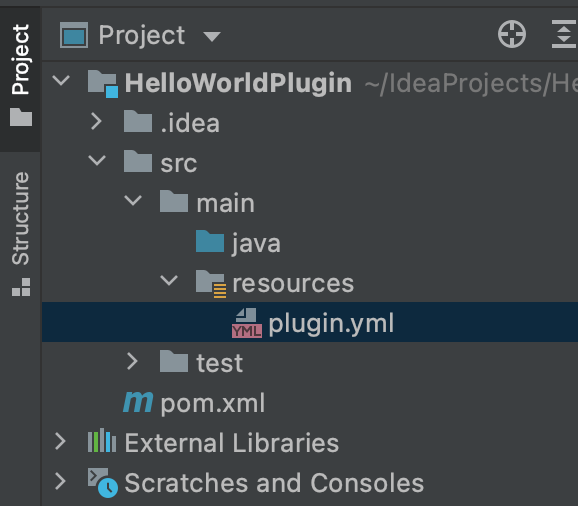
Create a new file inside your src/main/resources directory, called plugin.yml. It should look like this:
Again, just copy/paste the following code into your plugin.yml file:
name: HelloWorldPlugin # The name of your plugin
author: "mfnalex" # Your username.
main: me.mfnalex.helloworldplugin.HelloWorldPlugin # Replace "me.mfnalex" with the Group ID you chose, and adjust "helloworldplugin.HelloWorldPlugin" if you chose another plugin name.
version: ${project.version} # Maven will automatically replace this with the version number defined in your pom.xml
api-version: "1.13" # Optional, but you should add this when your plugin should run on ANY versions above 1.13
The most important part in your plugin.yml is the main part. It tells Spigot where the Main class of your plugin is located. The most commonly used convention for choosing the name of your Main class is this:
<yourGroupId>.<yourPluginNameInLowerCase>.<YourPluginName>
For example, I was using me.mfnalex as as Group ID and HelloWorldPlugin as plugin name, so my Main class will be called me.mfnalex.helloworldplugin.HelloWorldPlugin.
Creating your plugin’s Main class
The Main class is the entry point to your plugin. Spigot will use it to create the instance of your plugin so that it can interact with the game.
Important: You MUST use exactly the same name for this class as you used in your plugin.yml’s main section!
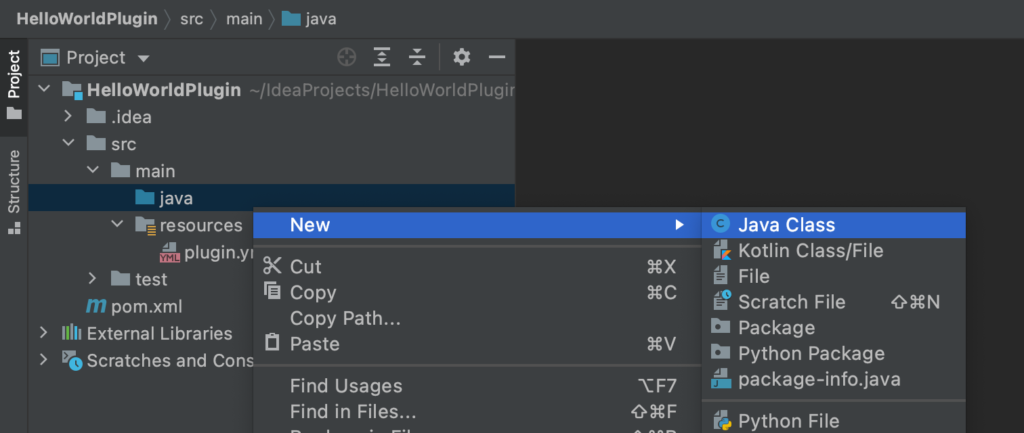
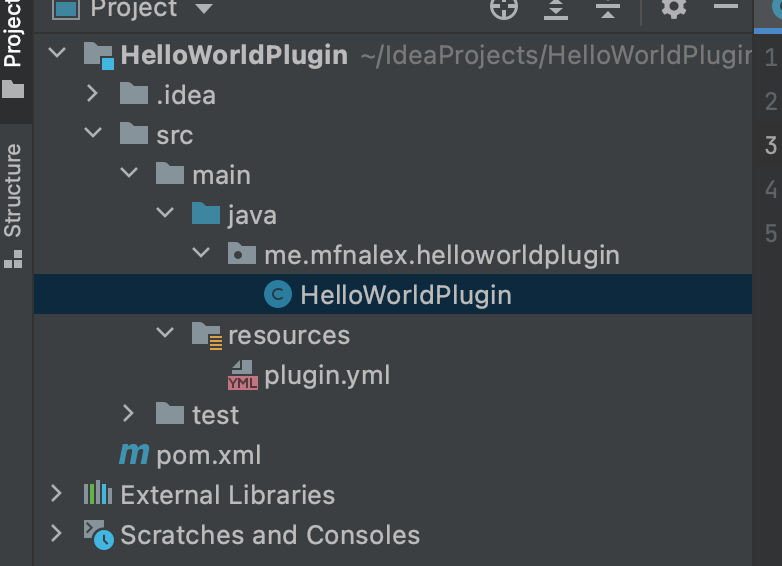
On the left side of IntelliJ, right-click the /src/main/java folder and click on New -> Java class:
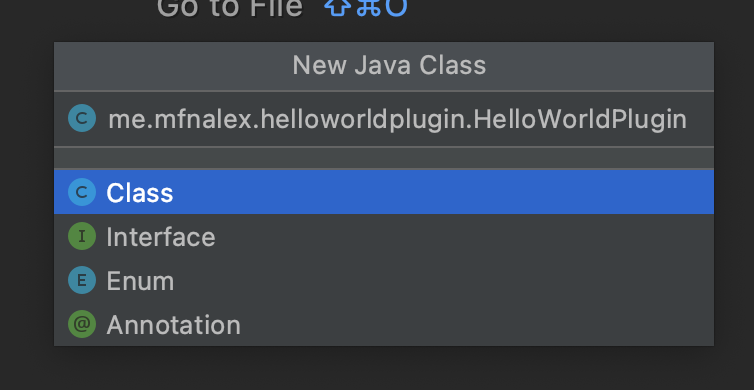
A menu opens. Give your main class the same name as you defined in your plugin.yml’s main section – in my case, it’s me.mfnalex.helloworldplugin.HelloWorldPlugin:
The actual name of your class is HelloWorldPlugin, but it’s located in the me.mfnalex.helloworldplugin package. If you didn’t do something wrong, it should look like this:
From now on, I’m going to assume that you have at least basic Java knowledge.
As you know, every class in Java extends the basic Object class. Bukkit/Spigot however requires your plugin to extend the JavaPlugin class, so we will add extends JavaPlugin behind your class name in it’s definition:

As you see, JavaPlugin is highlighted in red, because IntelliJ doesn’t know what JavaPlugin is. So, we have to import the class. Just hover with your mouse over the JavaPlugin part until the following menu appears:
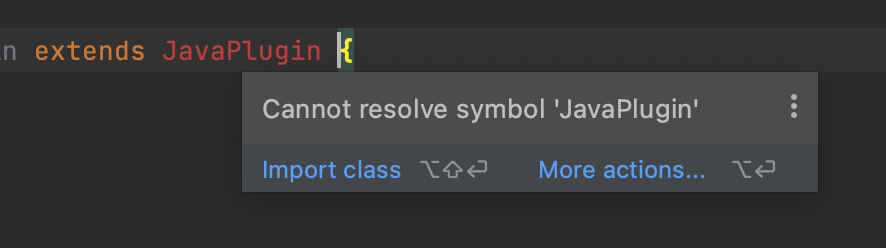
Click on Import class. IntelliJ automatically added import org.bukkit.plugin.java.JavaPlugin; to your class file.
Important: If for some reason the “Import class” button did not appear, you probably didn’t have IntelliJ reload your pom.xml after copy/pasting it. If you are sure that you properly did so, and it still doesn’t work, click on File -> Invalidate Caches…, tick the first and second checkbox, and then click on Invalidate and Restart.

Adding functionality
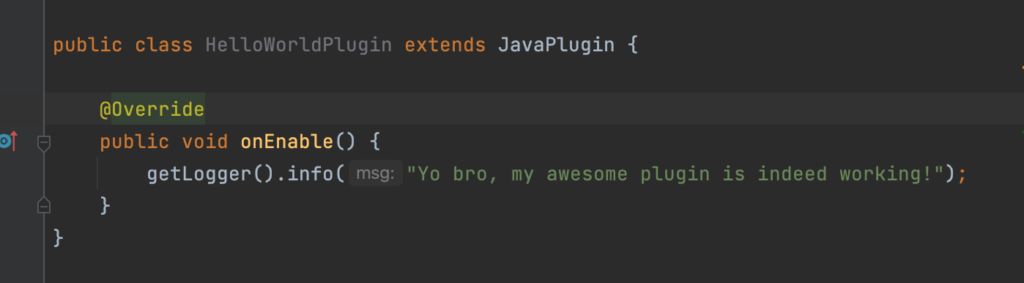
Congratulations, you just created your first working Bukkit/Spigot plugin! There’s one downside though: it doesn’t do anything yet. Let’s just add a nice message to our plugin that get’s printed when the plugin gets enabled.
As said, our plugin’s Main class extends JavaPlugin. The JavaPlugin class already provides a method called onEnable(). We can simply override this method by adding the following stuff inside our class:
    @Override
    public void onEnable() {
        getLogger().info("Yo bro, my awesome plugin is indeed working!");
    }
Note: The @Override part is optional. It tells your IDE that you are overriding the onEnable() function that’s already present in JavaPlugin, but it’s not needed for your plugin to actually work.
It should look something like this:
Compiling and testing your plugin
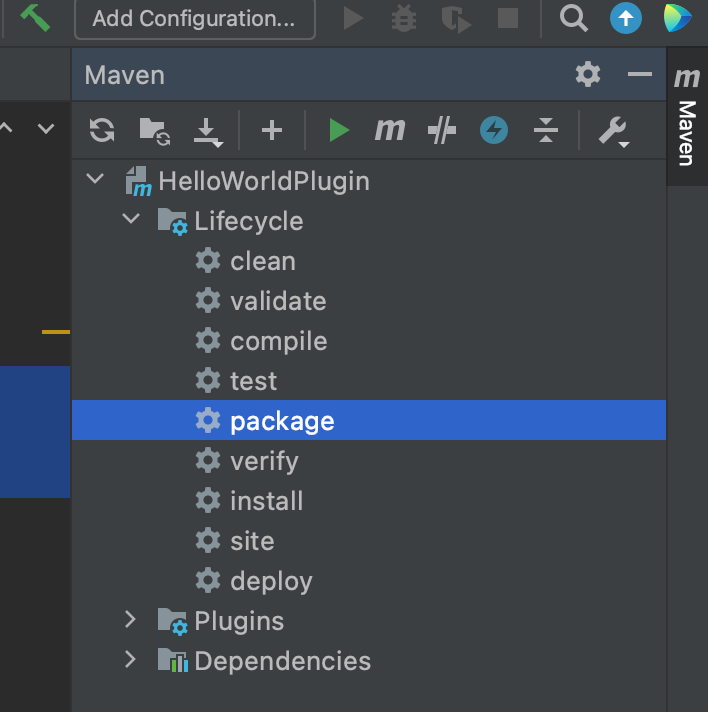
Let’s try to see if our awesome plugin works. As we’re using Maven to handle the building process, please DO NOT use IntelliJ’s build feature. Instead, we click on Maven at the top right corner, and then choose Lifecycle -> package. (You have to double-click on package)
“Package” means that Maven will compile our plugin’s class files, and store them inside a .jar file, while also adding the plugin.yml.
After you did that, your .jar file will be located in your project’s directory inside the target/ folder, so for example C:\Users\mfnalex\IdeaProjects\HelloWorldPlugin\target. You can simply copy it into your server’s plugins/ folder, restart it and you will see our awesome message in the console once the plugin loads.
Adding actual useful functionality
Adding actual features will be covered in my next post, which will be linked here when I’m done writing it. Thanks for reading 🙂

Join my Discord Server for feedback or support. Just check out the channel #programming-help 🙂