Hi there! Today I’m going to explain how to setup a multi-module project using maven to support different NMS versions.
Important notes about this tutorial:
Every step will have detailled screenshots using IntelliJ. I explicitly chose not to include everything as copy/pastable source code, but normal screenshots (you can click on them to show them fullscreen in a new tab) for different reasons:
- Screenshots can better show you which file exactly we’re editing, and where they are located. I’ll try to include the project structure in each screenshot with the currently opened file being selected.
- There’s very little to copy/paste anyway, most things are done automatically through IntelliJ / Maven. If you are explicitly supposed to copy/paste something, it will be in a selectable codeblock instead of a screenshot.
Please also note that this tutorial uses one NMS module per Minecraft version, and not per NMS version (e.g. I use separate modules for 1.19.1 and 1.19.2, even though both NMS versions use 1_19_R1 as package name). You’ll find the explanation for why I’m doing this later on in this blog post.
Prerequisities
I assume that you already know how to use mojang maps using maven. If you don’t know that, read this blog post first. You can also check out this blog post if you’re still using spigot/obfuscated mappings.
GitHub
The whole, finished project is available on GitHub.
Basic Setup
For this tutorial we start out with a brand new maven project. I’ll assume you’re using IntelliJ, but the steps are similar in other IDEs as well.
Go to File -> New Project, choose “New Project” and select “Maven” as Build system. I’ll call this project “MyMultiversionPlugin” and use “com.jeff-media” as group id. If you don’t know which group ID to use, check out this blog post.

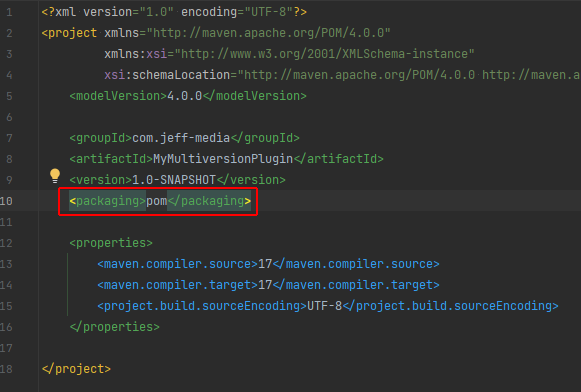
Click on “Create” and wait until IntelliJ created the project. There should now be a pom.xml which we from now on call “parent pom”. We’ll set the packaging of this to “pom” so we can use submodules:
You can remove the whole “src” folder now, because we don’t need it – the parent project itself won’t have any code.
Project Structure
When we’re done, our project shall have the following structure:
- MyMultimodulePlugin
- pom.xml (Parent POM)
- core
- pom.xml
- src/
- dist
- pom.xml
- src/
- spigot-1.19.4
- pom.xml
- src/
- spigot-1.20
- pom.xml
- src/
This means, we’ll have the following modules:
- The core module, which will contain all the normal plugin code (everything that’s not using NMS)
- One nms module per version, in my example spigot-1.19.4 and spigot-1.20 that contain the version-dependent NMS code
- One dist module (stands for “distribution”) – this will produce the final .jar file and doesn’t have any code itself, rather it only has your core module and all your NMS modules as dependencies and shades them into one .jar file
Creating the core module
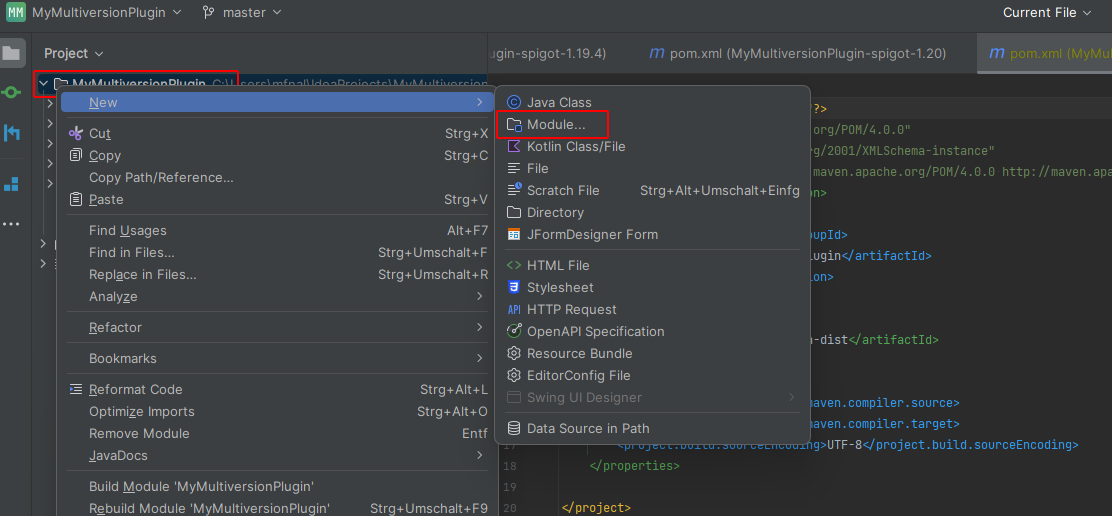
Let’s create the core module. This will contain the biggest part of your plugin. Right-click your parent folder in your IDE and create a new module.
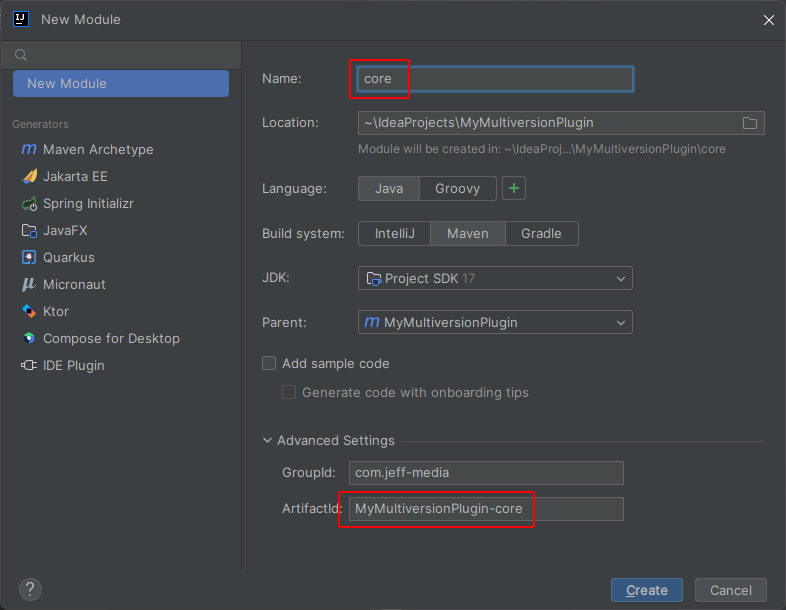
Now, the naming is a bit complicated – we’ll use “MyMultiversionPlugin-core” as artifact ID, but the folder will simply be called “core”:
You should now have a parent pom.xml with artifact ID “MyMultiversionPlugin”, and the core module pom.xml inside the core/ folder with artifact ID “MyMultiversionPlugin-core”.
If you open your parent pom.xml again, you’ll see that we have a <modules> section that includes our core module:
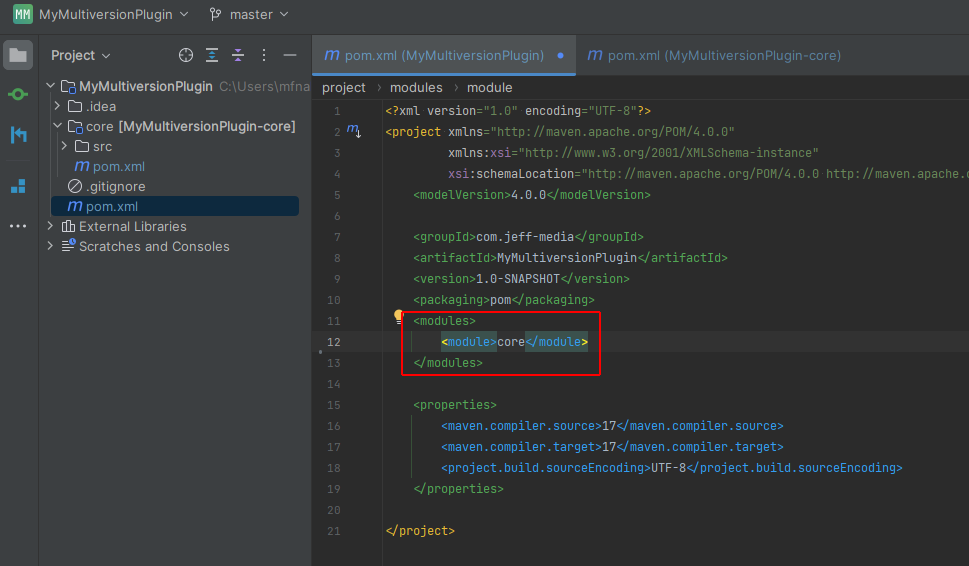
Important: The <modules> section uses the folder names of your modules, so it’s called “core” and not “MyMultiversionPlugin-core” here.
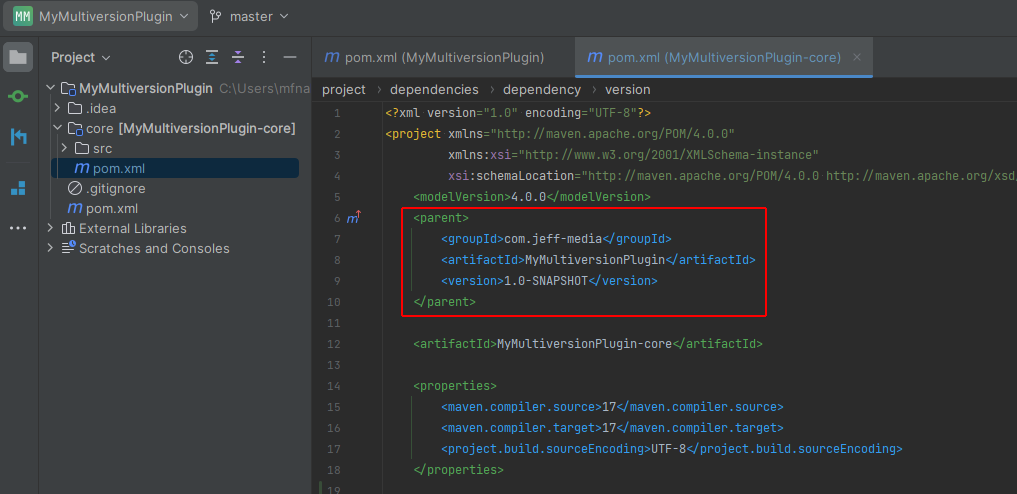
Let’s open our core module’s pom.xml. You’ll see that there’s a <parent> section:
Adding Spigot-API to the core module
Your core module depends on the Spigot-API. In my example, we’ll support Spigot 1.19.4 and Spigot 1.20, so we’ll use the lowest Spigot-API version as dependency in your core’s pom.xml:
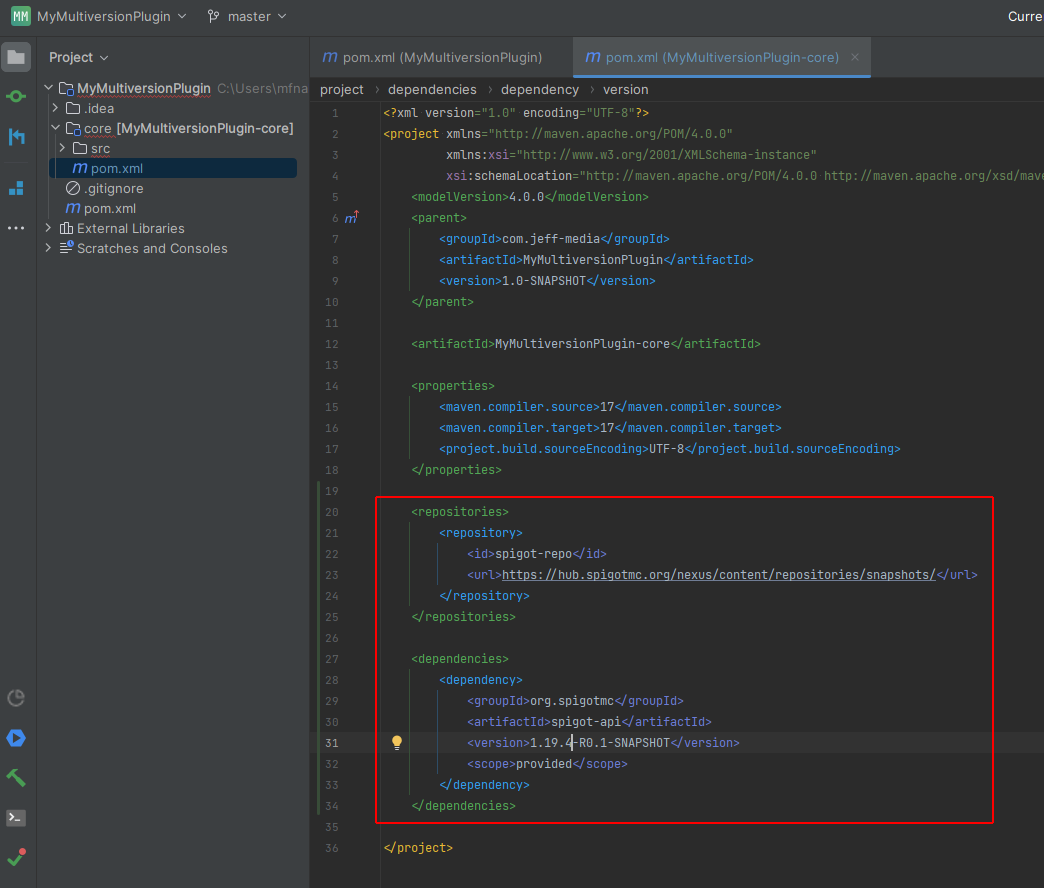
Don’t forget to reload maven after adding Spigot-API as dependency.
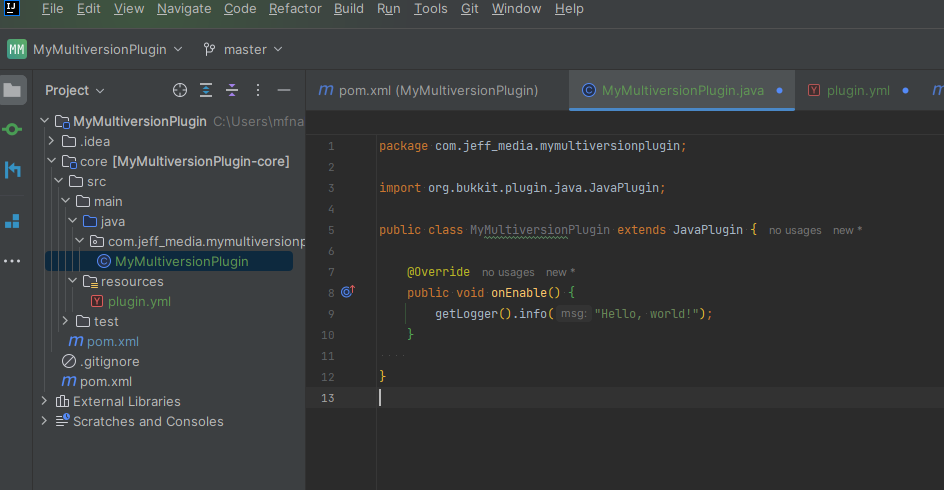
Creating the main class and plugin.yml
Now it’s time to create the main class and plugin.yml of our plugin. As usual, just create one class that extends JavaPlugin in src/main/java and a plugin.yml in src/main/resources. It’s now very important to note that you use the src/ folder inside your core module, and not the one in your parent project.
core/src/main/java/MyMultiversionPlugin.java:
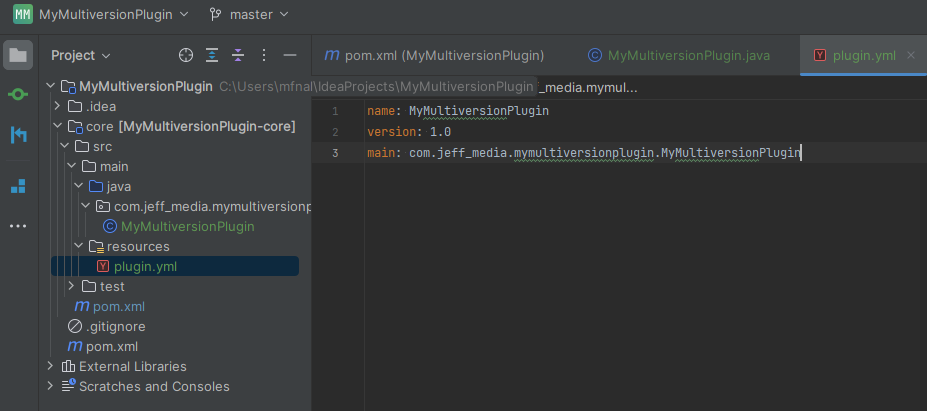
core/src/main/resources/plugin.yml:
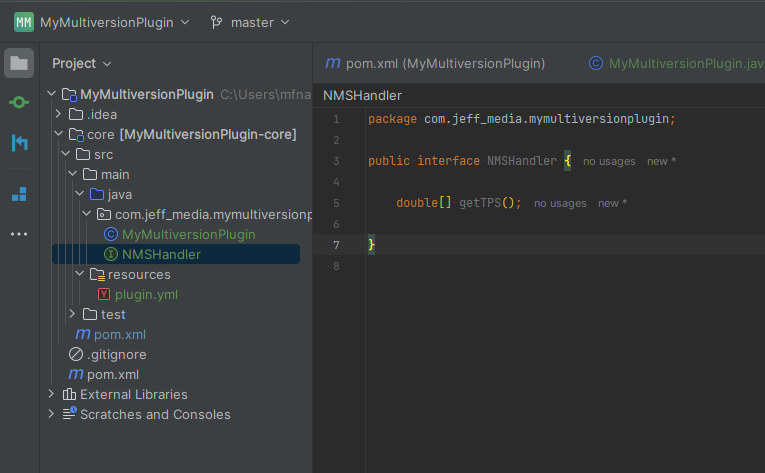
Creating the NMS interface
Now we create an interface that declares the methods that each NMS module shall be able to do. I cannot think of any feature the 1.20 API doesn’t provide except maybe getting the server’s current TPS. So, let’s create an interface called “NMSHandler” that declares this method:
Creating the NMS modules
Now the annoying part starts happening – we have to create one module per Minecraft version. In my example, that’ll be 1.19.4 and 1.20.
It is very important that you use the same naming scheme for all your NMS modules because later on, we’ll need a tiny bit of reflection to access them. I prefer the following naming scheme for the NMSHandler implementation and you should do the same: <packagename>.nms_<version>.NMSHandlerImpl, where <version> is e.g. 1_20 for 1.20, 1_19_4 for 1.19.4, 1_19_3 for 1.19.3, and so on.
Important: You’ll have noticed that I am using the “full” version as package and module names, e.g. “nms_1_19_1” and “nms_1_19_2” for 1.19.1 and 1.19.2, even though both 1.19.1 and 1.19.2 use “1_19_R1” as NMS package name. In older tutorials, you’ll often see people simply using a shared module for all Minecraft versions that share the same NMS package name, but this only works fine for 1.16.5 and older. It will not properly work on 1.17+, as the obfuscation map does change even between versions sharing the same package name.
Creating the first NMS module
Let’s start with the 1.20 module!
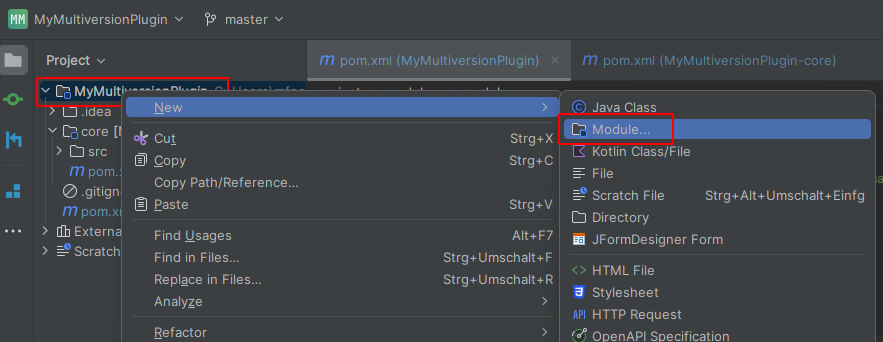
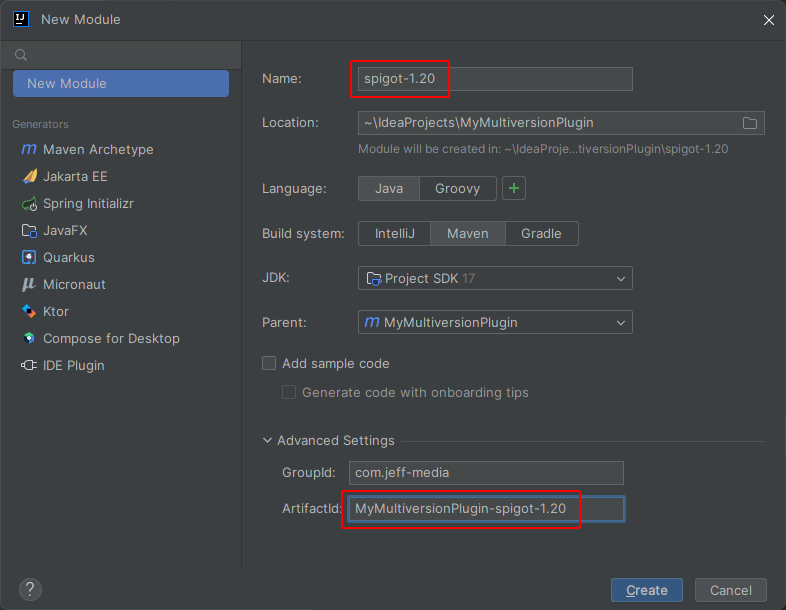
Again, we right click our parent folder in IntelliJ and create a new module, just like we did for the core module. This time, we call the folder “spigot-1.20” and the module “MyMultiversionPlugin-spigot-1.20”:
We now have a new folder called “spigot-1.20” that includes a new pom.xml, and our new module was also added to the parent pom.xml’s <modules> section.
Now, open your new spigot-1.20 pom.xml and add the Spigot 1.20 dependency. I’m going to use the mojang mapped dependency. This is exactly the same as described in my blog post about how to use mojang maps, except that we add this only to the spigot-1.20 module. If you create a module for versions prior to 1.17, you can use the normal NMS dependency without mojang maps.
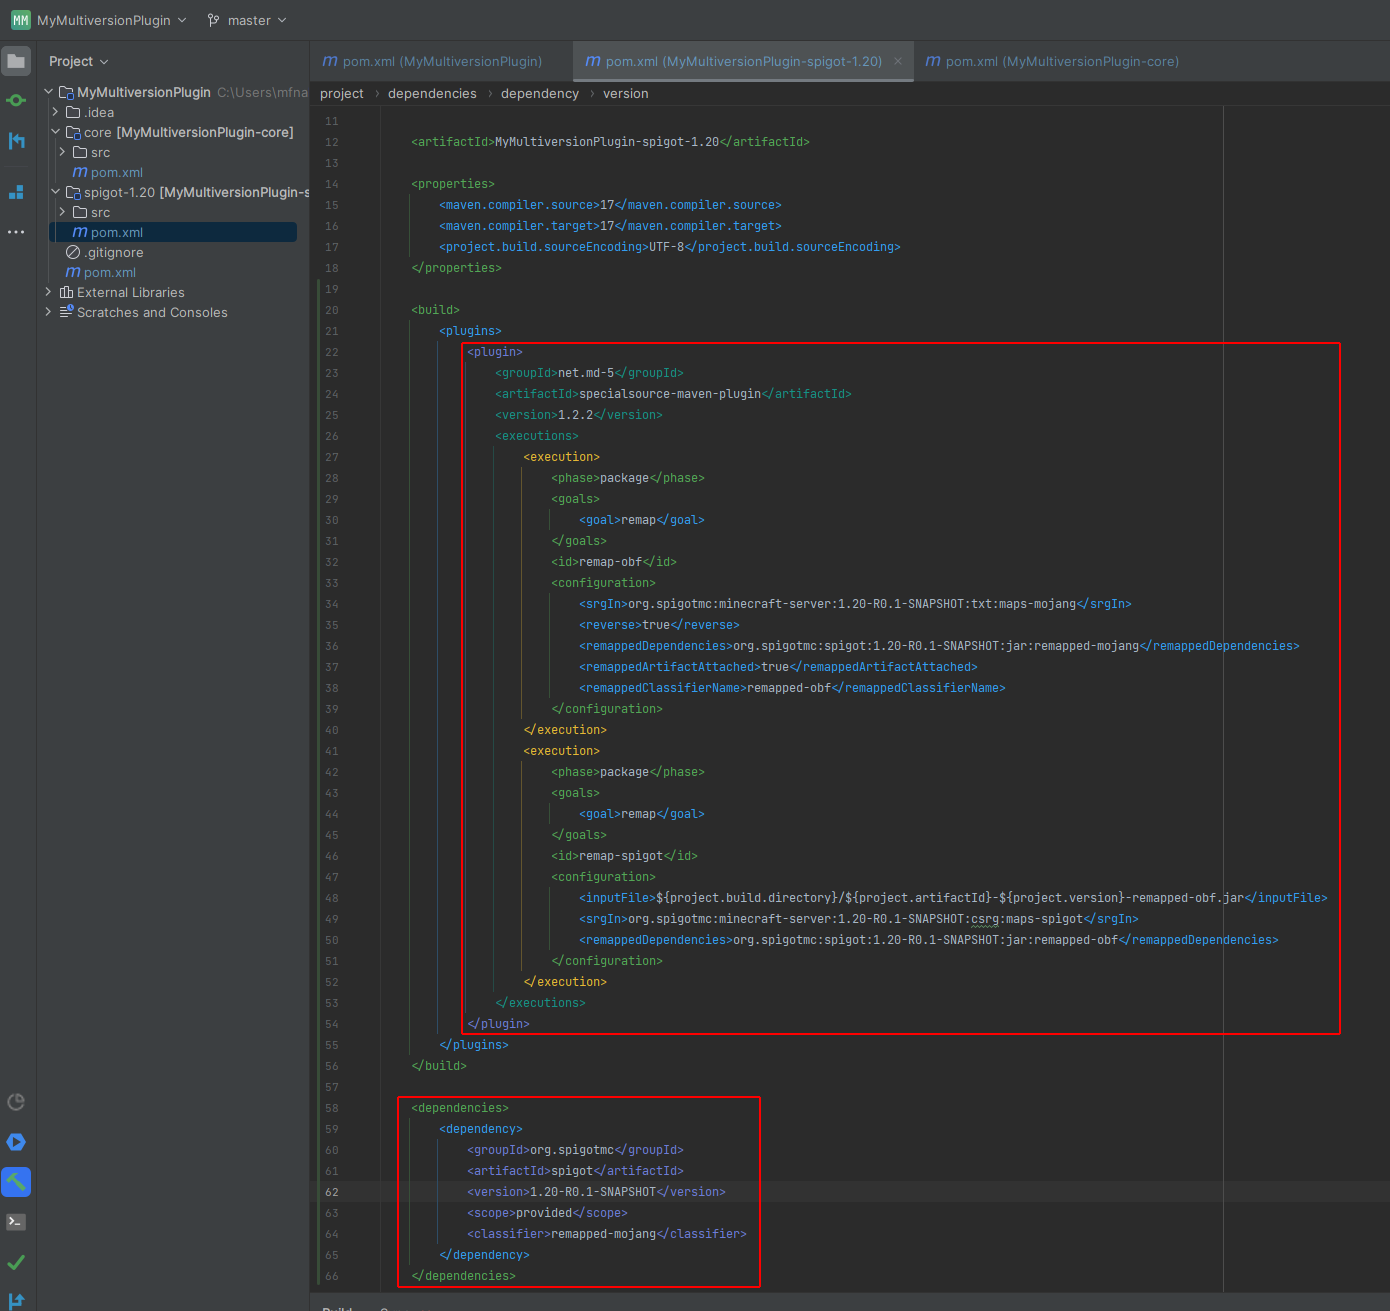
As mentioned, you can copy/paste the large block for the “specialsource-maven-plugin” from my blog post about mojang maps, just be sure to replace the version accordingly. Also note that we do not need any repository for the NMS dependency because it will be available in your local maven repository after you’ve run BuildTools for that version (which of course is also explained in above mentioned blog post).
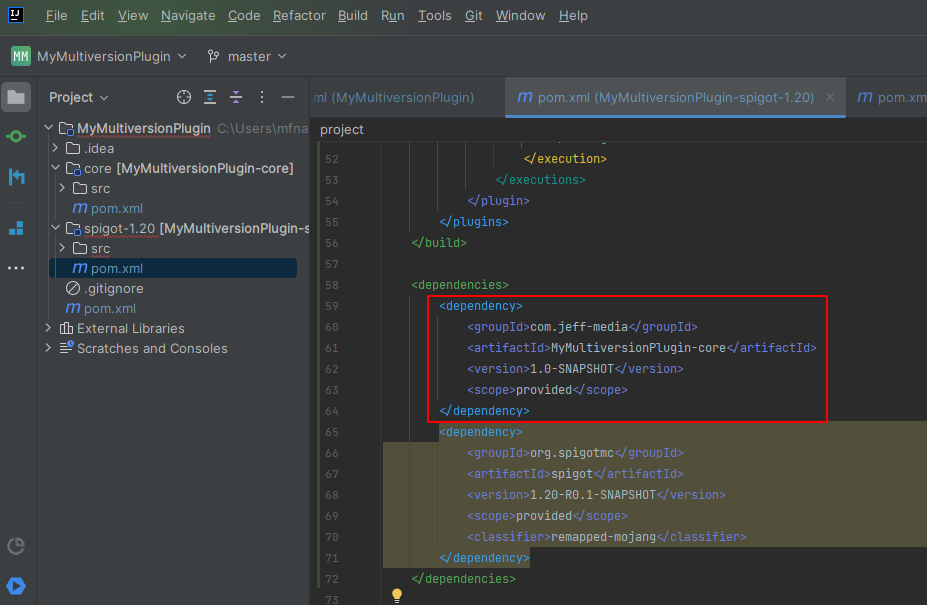
Now we want to implement our NMSHandler in the spigot-1.20 module. This of course requires having our core module as dependency in the spigot-1.20 module. Note that we set the <scope> to provided, and that we also specify the proper version as declared in our parent pom.xml:
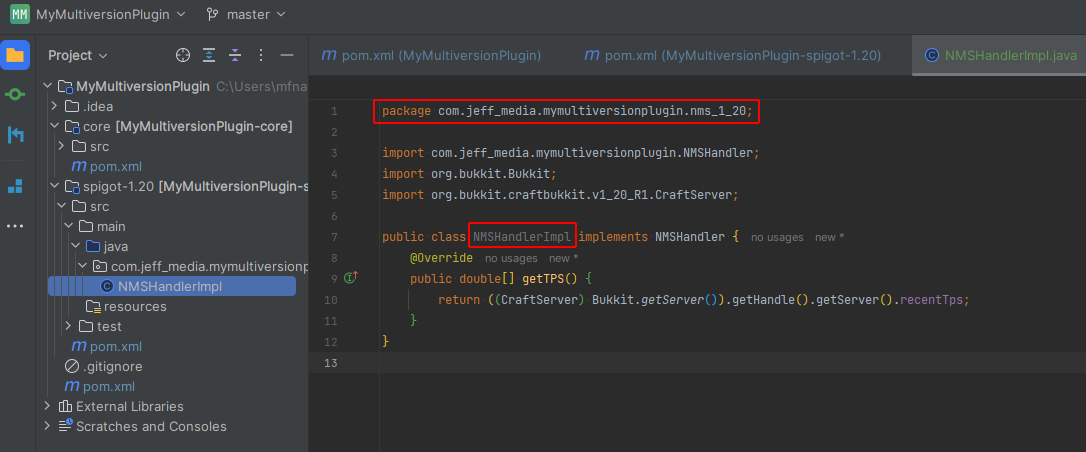
We can now create a new class in our spigot-1.20 module that implements our NMSHandler. As mentioned above, I chose to call this class NMSHandlerImpl and name the package com.jeff_media.mymultiversionplugin.nms_1_20.
We also have to implement the getTPS() method using some version-specific NMS code, and include the import of our NMSHandler interface from the core module:
Creating the other NMS modules
Now you repeat everything you did for the 1.20 module for the other versions you want to support. In my case, I create another module in the folder “spigot-1.19.4” with the artifact ID “MyMultiversionPlugin-spigot-1.19.4” that uses the 1.19.4 NMS dependency and uses “com.jeff_media.mymultiversionplugin.nms_1_19_4” as package name.
Creating an instance of the NMSHandler
Now we need to create an instance of our NMSHandler in the core module. You probably remember that each of our NMS modules depends on the core module, which means that the core module cannot depend on any of the NMS modules, as it’d because them to depend on each other (“cyclic dependency”).
This means that we’re gonna use a tiny bit of reflection. As you remember, the package name of our NMSHandler implementations is called ...nms_1_20, ...nms_1_19_4, etc.
That means we gotta somehow determine the correct package name using some String manipulation, so that we get 1_19_4 on 1.19.4 and 1_20 on 1.20.
We have two reliable ways to determine the currently running version, which is Bukkit.getVersion() and Bukkit.getBukkitVersion(). Here’s a few examples what both methods will return on different versions and forks:
| Server Software / Version | Bukkit.getVersion() | Bukkit.getBukkitVersion() |
| Spigot 1.16.1 | git-Spigot-9639cf7-4b9bc9d (MC: 1.16.1) | 1.16.1-R0.1-SNAPSHOT |
| Paper 1.20 | git-Paper-17 (MC: 1.20) | 1.20-R0.1-SNAPSHOT |
| Purpur 1.20.1 | git-Purpur-2023 (MC: 1.20.1) | 1.20.1-R0.1-SNAPSHOT |
Although the output of Bukkit.getBukkitVersion() is more consistent and easier to parse into our desired String, I prefer to use Bukkit.getVersion() as that is supposed to return the actual running Minecraft version instead of just the Bukkit version that this software implements. There could for example be a weird Forge/Bukkit hybrid server software that provides a 1.20 Bukkit API, but is actually running on 1.16.5 NMS – in this case, we would want to instantiate our 1.16.5 NMS handler (if we decide to support this ancient version in the first place) instead of the 1.20 one.
I noticed that across all forks and all versions, the output of Bukkit.getVersion() always ends with (MC: <version>), and that big updates usually don’t contain a patch part in their version (e.g. it’s 1.20 instead of 1.20.0), so I came up with this simple regular expression to determine the version from the output:
\(MC: (?<version>[\d]+\.[\d]+(\.[\d]+)?)\)
This will match the whole (MC: 1.20.1) part including the parantheses, but the named group "version" will only contain what we need, e.g. “1.20.1” or “1.18”, so we can now easily write a method that returns the full class name of our NMSHandler implementation.
Note that we have to “double escape” the regular expression’s escape sequences in our source code (so we gotta replace every \ with \\), but IntelliJ handles this automatically when pasting the expression into our code.
We’ll write a tiny method that does nothing except to output the currently running version (and cache it in case we wanna use it again later on). You can simply copy/paste it into your core module’s main class:
private String minecraftVersion;

/**
 * Returns the actual running Minecraft version, e.g. 1.20 or 1.16.5
 *
 * @return Minecraft version
 */
private String getMinecraftVersion() {
    if (minecraftVersion != null) {
        return minecraftVersion;
    } else {
        String bukkitGetVersionOutput = Bukkit.getVersion();
        Matcher matcher = Pattern.compile("\\(MC: (?<version>[\\d]+\\.[\\d]+(\\.[\\d]+)?)\\)").matcher(bukkitGetVersionOutput);
        if (matcher.find()) {
            return minecraftVersion = matcher.group("version");
        } else {
            throw new RuntimeException("Could not determine Minecraft version from Bukkit.getVersion(): " + bukkitGetVersionOutput);
        }
    }
}
Great! Now we can easily obtain the version. All that we gotta now is to replace the dots with underscores, add the package name prefix and the class name, and then we can instantiate our NMSHandler.
I will show you two possibilities options how this method could look, where one is pretty verbose on the error messages (to help you debugging if something does not work), and the other one is much shorter and more suited for the finished plugin once you got everything working.
The verbose version
The verbose version will catch every exception separately and give you information about why the NMSHandlerImpl couldn’t be created.
@SuppressWarnings("unchecked")
private NMSHandler createNMSHandler() throws RuntimeException {
    String clazzName = "com.jeff_media.mymultiversionplugin.nms_" + getMinecraftVersion()
            .replace(".", "_") + ".NMSHandlerImpl";
    try {
        Class<? extends NMSHandler> clazz = (Class<? extends NMSHandler>) Class.forName(clazzName);
        return clazz.getConstructor().newInstance();
    } catch (ClassNotFoundException exception) {
        throw new RuntimeException("Can't instantiate NMSHandlerImpl for version " + getMinecraftVersion() +
                " (class " + clazzName + " not found. This usually means that this Minecraft version is not " +
                "supported by this version of the plugin.)", exception);
    } catch (InvocationTargetException exception) {
        throw new RuntimeException("Can't instantiate NMSHandlerImpl for version " + getMinecraftVersion() +
                " (constructor in class " + clazzName + " threw an exception)", exception);
    } catch (InstantiationException exception) {
        throw new RuntimeException("Can't instantiate NMSHandlerImpl for version " + getMinecraftVersion() +
                " (class " + clazzName + " is abstract)", exception);
    } catch (IllegalAccessException exception) {
        throw new RuntimeException("Can't instantiate NMSHandlerImpl for version " + getMinecraftVersion() +
                " (no-args constructor in class " + clazzName + " is not accessible)", exception);
    } catch (NoSuchMethodException exception) {
        throw new RuntimeException("Can't instantiate NMSHandlerImpl for version " + getMinecraftVersion() +
                " (no no-args constructor found in class " + clazzName + ")", exception);
    }
}
The short version
The short version simply tells you that “this Minecraft version (…) is not supported by this version of the plugin”), or, if anything else is the problem, it’ll just rethrow the existing exception without further explanation.
@SuppressWarnings("unchecked")
private NMSHandler createNMSHandler() throws RuntimeException {
    String clazzName = "com.jeff_media.mymultiversionplugin.nms_" + getMinecraftVersion()
            .replace(".", "_") + ".NMSHandlerImpl";
    try {
        Class<? extends NMSHandler> clazz = (Class<? extends NMSHandler>) Class.forName(clazzName);
        return clazz.getConstructor().newInstance();
    } catch (ClassNotFoundException exception) {
        throw new RuntimeException("This version of minecraft (" + getMinecraftVersion() +
                ") is not supported by this version of the plugin)", exception);
    } catch (ReflectiveOperationException exception) {
        throw new RuntimeException(exception);
    }
}
Creating and using the NMSHandler instance
Usually you’re gonna create your NMSHandler instance only once during onEnable(), and then save it in a field. For example, we could do it like this:
private NMSHandler nmsHandler;

@Override
public void onEnable() {
    getLogger().info("Hello, world! I'll now try to create an NMSHandler for Minecraft " + getMinecraftVersion());
    nmsHandler = createNMSHandler();
    getLogger().info("It worked!");
}

public NMSHandler getNMSHandler() {
    return nmsHandler;
}
This will of course throw an exception and prevents your plugin from enabling, if the createNMSHandler() method throws an exception. You can alternatively adjust the createNMSHandler() method to return null in unsupported versions, and then cleanly return from your onEnable() method, or whatever floats your goat or tickles your pickle.
Creating the final .jar – the dist module
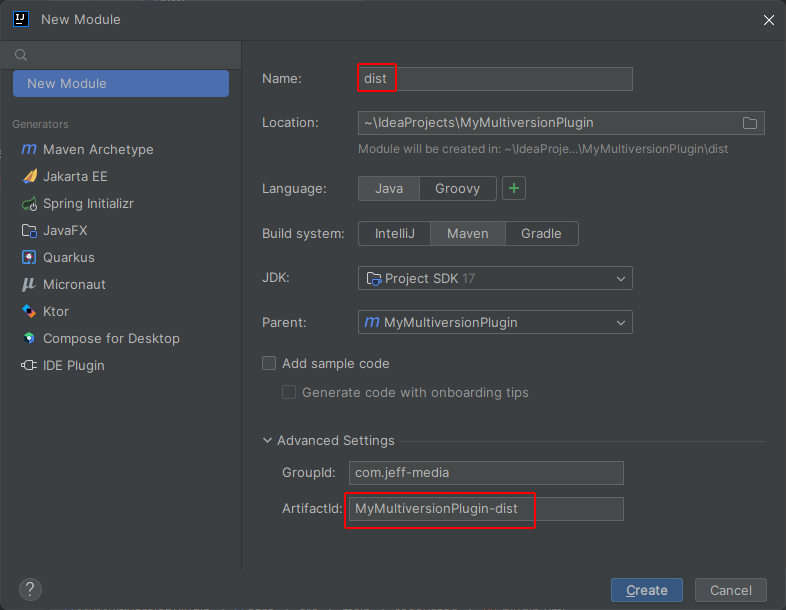
Now we create the “dist” module (short for “distribution”) that simply shades all your other modules into one final .jar.
Again, create a new module, call the folder “dist” and the artifact ID “MyMultiversionPlugin-dist”:
You can delete the src/ folder inside this module, it won’t have any code on its own.
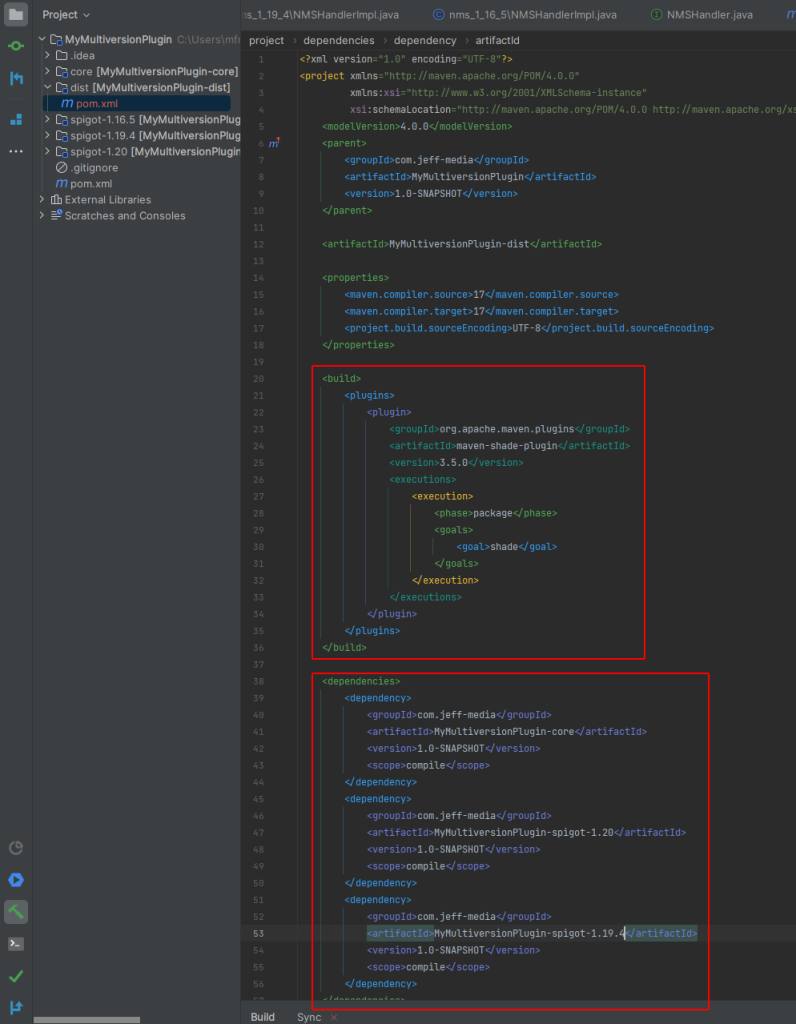
Inside the dist module’s pom.xml, we first add the maven-shade-plugin:
<build>
    <plugins>
        <plugin>
            <groupId>org.apache.maven.plugins</groupId>
            <artifactId>maven-shade-plugin</artifactId>
            <version>3.5.0</version>
            <executions>
                <execution>
                    <phase>package</phase>
                    <goals>
                        <goal>shade</goal>
                    </goals>
                </execution>
            </executions>
        </plugin>
    </plugins>
</build>
We also add all our other modules as dependency to the dist module:
<dependencies>
    <dependency>
        <groupId>com.jeff-media</groupId>
        <artifactId>MyMultiversionPlugin-core</artifactId>
        <version>1.0-SNAPSHOT</version>
        <scope>compile</scope>
    </dependency>
    <dependency>
        <groupId>com.jeff-media</groupId>
        <artifactId>MyMultiversionPlugin-spigot-1.20</artifactId>
        <version>1.0-SNAPSHOT</version>
        <scope>compile</scope>
    </dependency>
    <dependency>
        <groupId>com.jeff-media</groupId>
        <artifactId>MyMultiversionPlugin-spigot-1.19.4</artifactId>
        <version>1.0-SNAPSHOT</version>
        <scope>compile</scope>
    </dependency>
</dependencies>
Your dist’s pom should now look like this:
You can now compile your whole plugin. I suggest you to always use mvn clean install on the parent pom if you use multi module projects, to avoid caching-related issues when you changed code in one of the submodules.
So, to compile, first double click on the parent’s “clean” goal, and when that’s done, double click the parent’s “install” goal in IntelliJ’s maven tab:
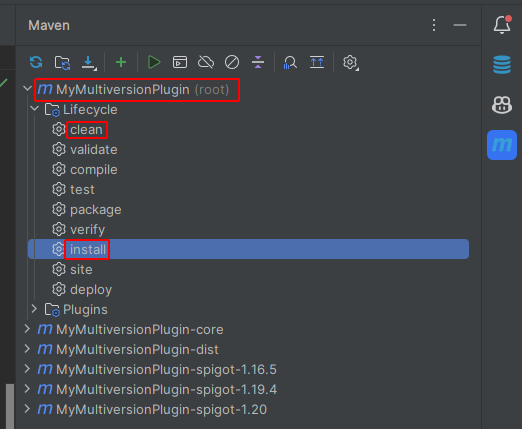
The final .jar now is located inside the dist’s target folder: dist/target/MyMultiversionPlugin-dist-1.0-SNAPSHOT.jar
Optional: Adding a command to see if it works
Let’s add a pretty simple /tps command that prints out the TPS, so we can check whether whole setup is actually working.
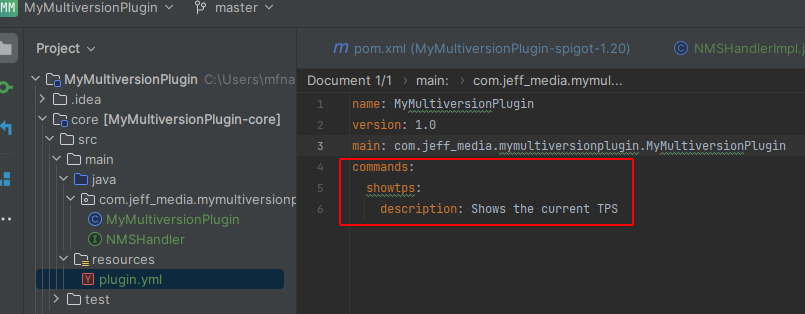
Add a command named “showtps” to your plugin.yml, then just write a tiny command executor:
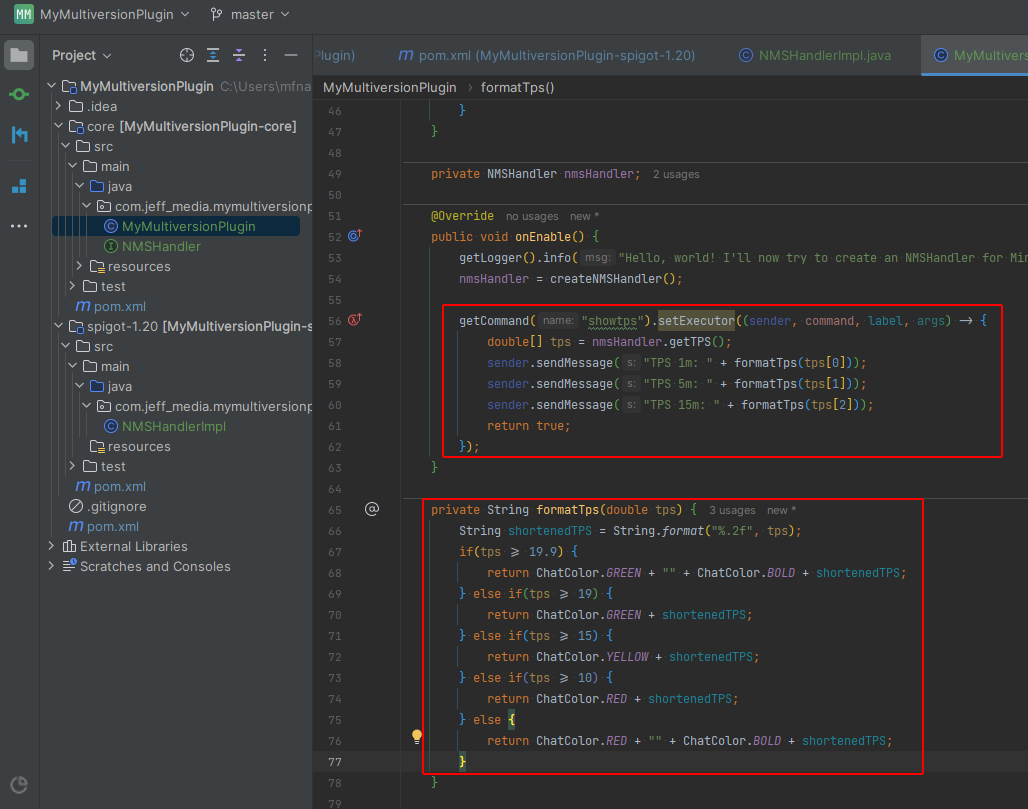
If you wanna copy/paste that code into your main class, here you go:
@Override
public void onEnable() {
    getLogger().info("Hello, world! I'll now try to create an NMSHandler for Minecraft " + getMinecraftVersion());
    nmsHandler = createNMSHandler();
    getCommand("showtps").setExecutor((sender, command, label, args) -> {
        double[] tps = nmsHandler.getTPS();
        sender.sendMessage("TPS 1m: " + formatTps(tps[0]));
        sender.sendMessage("TPS 5m: " + formatTps(tps[1]));
        sender.sendMessage("TPS 15m: " + formatTps(tps[2]));
        return true;
    });
}
private String formatTps(double tps) {
    String shortenedTPS = String.format("%.2f", tps);
    if(tps >= 19.9) {
        return ChatColor.GREEN + "" + ChatColor.BOLD + shortenedTPS;
    } else if(tps >= 19) {
        return ChatColor.GREEN + shortenedTPS;
    } else if(tps >= 15) {
        return ChatColor.YELLOW + shortenedTPS;
    } else if(tps >= 10) {
        return ChatColor.RED + shortenedTPS;
    } else {
        return ChatColor.RED + "" + ChatColor.BOLD + shortenedTPS;
    }
}
Obviously you’d normally use a separate class implementing CommandExecutor, but who cares – this is just an example. Now we can compile everything (as mentioned above), then put the MyMultiversionPlugin-dist-1.0-SNAPSHOT.jar into our plugins/ folder, and try it out!
Addendum: Getting rid of redundant stuff
You’ll notice that every pom.xml by default includes the <properties> section. This is actually not needed, you can remove those <properties> from all your pom files except for the parent pom.
You can also declare repositories you wish you to use in more than one module in your parent pom, instead of declaring them in multiple modules.
That’s it!
That’s it, your multi module setup should be working fine. Here’s again the GitHub link to the full source code.

Join my Discord Server for feedback or support. Just check out the channel #programming-help 🙂
Thank you, this was incredibly helpful!